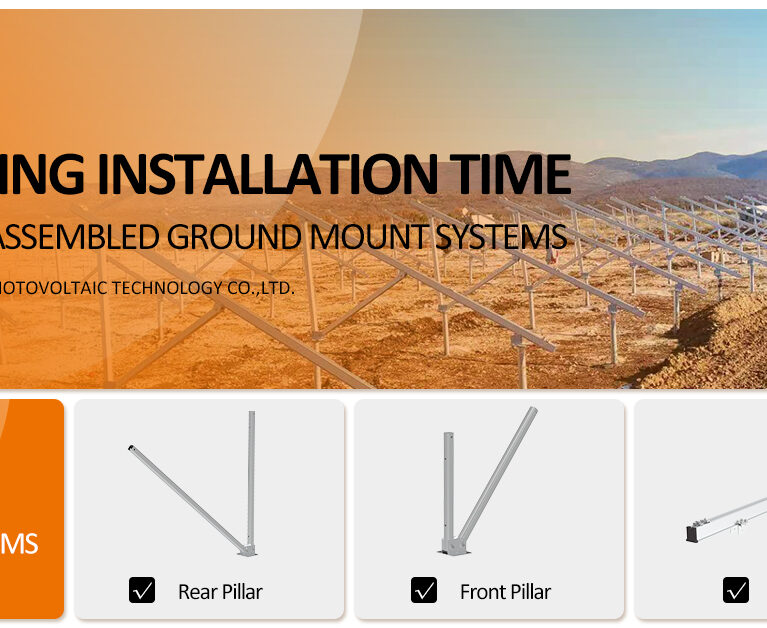
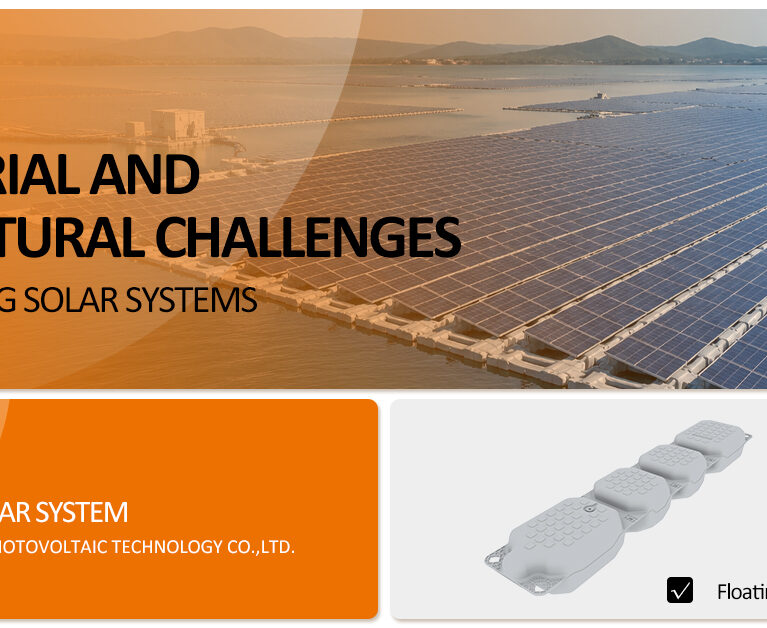
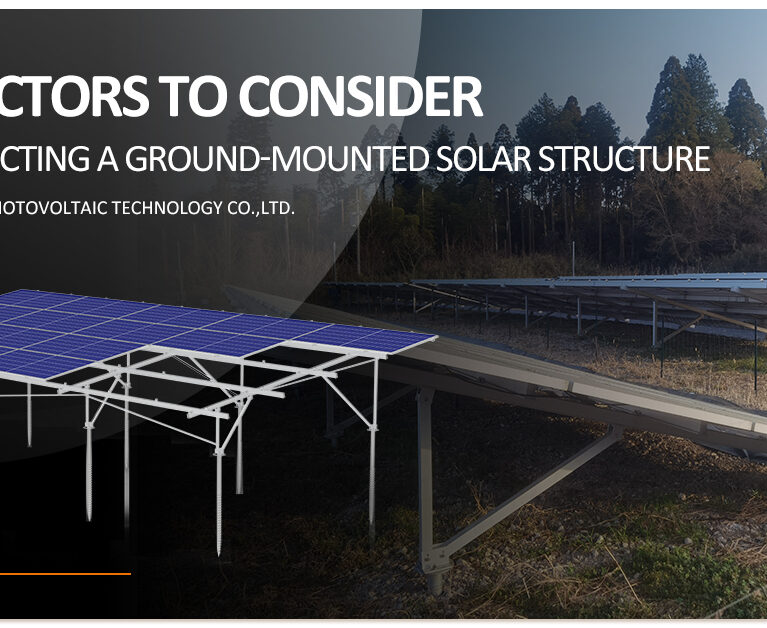
English


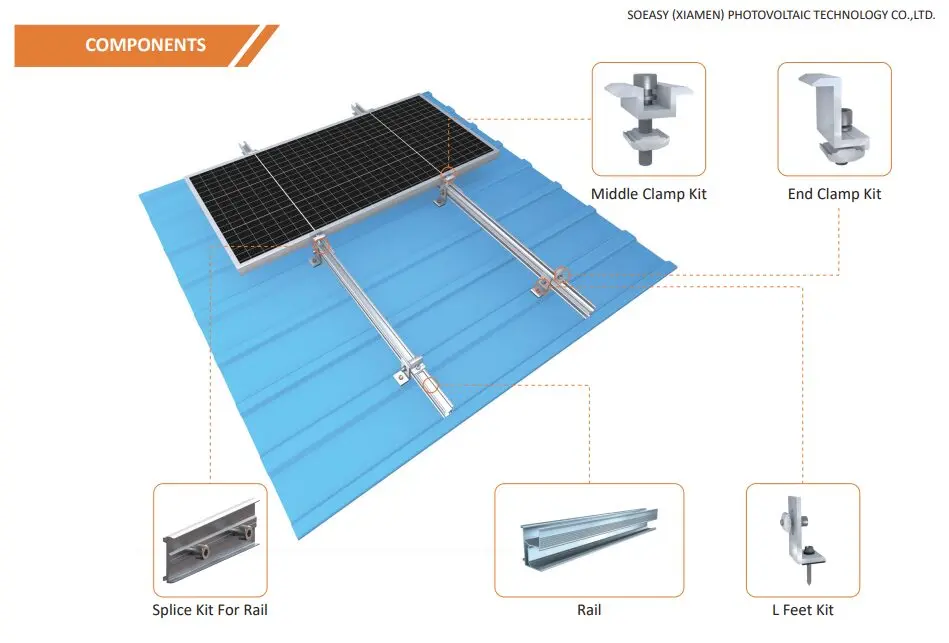
クランプ ― 太陽光発電モジュールを固定するための主要部品
太陽光発電架台システムにおいて、クランプはソーラーモジュールをレールに接続する基本部品です。クランプは小型ながら、各モジュールを構造体にしっかりと固定する上で極めて重要な役割を果たします。品質の低いクランプや不適切なクランプを使用すると、強風時にモジュールが脱落したり、架台の変形、微細な亀裂、さらには連鎖反応によるシステム障害を引き起こす可能性があります。
クランプの選択は、以下の点に直接影響します。
- システムの安全性:クランプの締め付け力は、極端な風荷重下でのモジュールの安定性を決定します。
- 設置効率:クランプの設計は、設置速度と人件費に影響します。
- 長期信頼性:材料選定と緩み防止設計が25年の耐用年数に影響します。
様々な種類のクランプの中でも、中間クランプと端部クランプは最も一般的で基本的なものです。これらは似ているように見えますが、機能、力特性、取り付け方法において大きく異なります。
この記事では、中間クランプと端部クランプを体系的に比較し、それぞれの定義、機能的な違い、選定基準、設置箇所などを解説することで、太陽光発電プロジェクトに最適なクランプを選定するお手伝いをします。
ミッドクランプとエンドクランプとは何ですか?
1. ミッドクランプ
定義:
ミッドクランプは、隣接する2つの太陽光発電モジュールの間に設置され、モジュールのフレームの左右両側(または上下両側)を挟み込み、レールに固定します。
典型的なポジション:
- 配列内部、モジュール間に位置する
- 太陽光発電モジュールの各列の中央(両端ではない)
主要機能:
- 隣接するモジュールを固定し、一定の間隔を維持する
- モジュールからレールへ荷重を伝達する
- 太陽光発電モジュール間の間隔が均一で整然としていることを確認してください。
共通の特徴:
| 特徴 | 説明 |
|---|---|
| 両面クランプ | 隣接するモジュール両方をクランプする |
| 中央配置 | 2つのモジュールの間に位置し、対称的に荷重がかかる |
| 間隔制御 | 太陽光発電モジュール間の間隔を一定に保ちます |
| 簡単な設置 | 通常は1本のボルトでレールに固定される |
2. エンドクランプ
定義:エンドクランプは太陽光発電アレイの両端に配置され、エッジモジュールの外枠を挟み込み、レールに固定することでアレイの境界を規定する。
典型的なポジション:
- 各モジュール行の開始時と終了時に
- 太陽光発電アレイの端
主要機能:
- エッジモジュールを固定して、滑り落ちないようにする
- 太陽光発電アレイの境界に機械的な拘束を与える
- 太陽光発電アレイの端部でより高い風荷重に耐える
共通の特徴:
| 特徴 | 説明 |
|---|---|
| 片側クランプ | 太陽光発電モジュール1枚の外枠のみを固定します。 |
| エンドアレンジメント | アレイの両端に配置され、非対称な力 |
| 境界制約 | 太陽光発電モジュールが外側に滑り落ちるのを防ぎます |
| エッジストップ設計 | 一部のエンドクランプにはエッジストップが付いており、軸方向の拘束力をさらに高めている。 |
中間クランプと端クランプの主な違い
1. 機能と位置
| 比較次元 | ミッドクランプ | エンドクランプ |
|---|---|---|
| 設置位置 | PVモジュール間 | PVアレイの端で |
| クランプ方法 | 両面 | 片面 |
| 主な機能 | 間隔を維持し、隣接する太陽光発電モジュールを固定する | 端の太陽光発電モジュールを固定し、滑り落ちを防ぐ |
| 負荷特性 | 対称荷重 | 非対称荷重 |
| 数量 | 多数(1列あたりのPVモジュール数より1少ない数) | 少数(1列に2個) |
概念的理解:
- 中間クランプは「コネクタ」として機能し、隣接するモジュール同士を接続します。
- エンドクランプは「アンカーポイント」として機能し、列の両端を固定します。
2. 素材と耐久性
| 比較次元 | ミッドクランプ | エンドクランプ |
|---|---|---|
| 主な材料 | アルミニウム合金6063/6005 | アルミニウム合金6063/6005 |
| ファスナー | ステンレス鋼304/316 | ステンレス鋼304/316 |
| ゴムパッド | EPDM | EPDM |
| 強度要件 | 中くらい | (端部での風荷重が大きいため)高くなる |
| 耐腐食性 | 中くらい | 高い(端の部分が湿気にさらされやすい) |
主な違い:
端部のモジュールは風荷重が大きく、湿気にさらされる機会も多いため、端部クランプには通常、より高い構造強度と耐腐食性が求められます。
3. インストール手順
| 比較次元 | ミッドクランプ | エンドクランプ |
|---|---|---|
| インストール手順 | エンドクランプの後に取り付けます | まずインストールします |
| 整合要件 | 隣接する2つの太陽光発電モジュールを揃える | 1つのPVモジュールを整列させる |
| インストールの難しさ | 適度 | より低い |
| 所要時間 | 適度 | より低い |
| 調整可能性: | 低い(隣接する太陽光発電モジュールによって制限される) | 高(太陽光発電モジュール1枚のみ整列) |
一般的なインストール手順:
- まず、エンドクランプを取り付けて最初のモジュールを固定します。
- 2つ目のモジュールを配置し、中間クランプを使用して固定します。
- 列が終わるまで繰り返します。
- 反対側に最後のエンドクランプを取り付けます。
- 中間クランプおよび端部クランプの選定基準
1. システムの種類
| システムの種類 | 中間クランプの選択 | エンドクランプの選択 |
|---|---|---|
| 大型地上局 | 標準的なミッドクランプ、コスト効率が良い | 強化されたエンドクランプ、強度重視 |
| 屋上分散型 | 軽量ミッドクランプ | 標準エンドクランプ、防水設計 |
| 追跡システム | 強化された中間クランプ(動荷重用) | 高強度エンドクランプ(緩み防止用) |
| 農業PV | 標準ミッドクランプ | 標準エンドクランプ |
2. モジュールのサイズと種類
| モジュールタイプ | 中間クランプ要件 | エンドクランプの要件 |
|---|---|---|
| 額装済み(厚さ35mm) | 標準クランプ | 標準エンドクランプ |
| 額装済み(厚さ40~50mm) | 背の高いクランプ | 背の高いエンドクランプ |
| フレームなし/二重ガラスモジュール | 特殊なフレームなしミッドクランプ(ワイドコンタクト) | 特殊なフレームなしエンドクランプ |
| 大型太陽光発電モジュール(2.5m²以上) | 強化または数量増加 | 強化 |
3. 環境条件
| 環境 | 中間クランプ要件 | エンドクランプの要件 |
|---|---|---|
| 沿岸部/高湿度 | ステンレス鋼316製のファスナー | ステンレス鋼316製のファスナー |
| 強風地帯 | 標準または強化 | 補強済み(端部にかかる風荷重が大きい) |
| 産業汚染 | 耐腐食性材料 | 耐腐食性材料 |
| 高濃度塩水噴霧 | 陽極酸化処理+ステンレス鋼316 | 陽極酸化処理+ステンレス鋼316 |
重要事項:
アレイ端部のエンドクランプは、最も大きな風荷重を受けます。強風地域では、エンドクランプの強化、またはクランプ数の増加が必要です。
4. システム設計
| デザイン要素 | 中間クランプに関する考慮事項 | エンドクランプに関する考慮事項 |
|---|---|---|
| モジュールレイアウト方向 | 水平配置と垂直配置ではクランプの数が異なります。 | 列の両端に1つずつ |
| レール間隔 | 中間クランプ位置を決定します | エンドクランプの位置を決定します |
| 負荷要件 | 荷重計算に基づいてクランプ強度を選択してください。 | 端部領域にはより高い強度が必要 |
中間クランプと端部クランプの主な利点
ミッドクランプの利点
- 太陽光発電モジュールの間隔を一定に保つことで、設置時の位置ずれを低減します。
- 隣接するモジュールを一体型のアレイに接続することで、全体の安定性が向上し、動作中のモジュールのずれを防ぐことができます。
エンドクランプの利点
- 太陽光発電アレイの端部を固定し、特に沿岸部や強風地域では、風荷重によるモジュールのずれを防いでください。
- 太陽電池アレイの構造的完全性を確保する上で重要な、機械的な境界を形成する。一部の端部クランプは、エッジストップ付きで、モジュールがレールに沿って移動するのを防ぐ役割も果たす。
インストールに関するヒント
ミッドクランプの取り付けに関するヒント
- クランプの高さがモジュールフレームの厚さと一致していることを確認してください。
- トルクレンチを使用して、推奨トルク(通常15~20N・m)で締め付けてください。締め付けすぎるとモジュールフレームが損傷する恐れがあり、締め付けが不十分だと締め付け力が不足します。
- 隣接するモジュール間には、均等な間隔(通常10~20mm)を確保してください。ゴムパッドがフレームとの接触面を完全に覆っていることを確認してください。
- 端から端まで順番に取り付けてください。
エンドクランプの取り付けに関するヒント
- 端部クランプは中間クランプよりも大きな力がかかるため、適切なトルクをかけるようにしてください。
- フレームの変形やモジュールの微細な亀裂を防ぐため、締め付けすぎには注意してください。
- 端ストッパー付きのクランプを使用する場合は、モジュールの端と位置が合うようにしてください。
- 屋根に取り付ける場合は、貫通箇所に適切な防水処理とシーリングを施してください。
一般的な設置に関する推奨事項
- 必ずトルクレンチを使用してください。「感覚」で締め付けるのは避けてください。
- トルク測定器の精度を維持するために、定期的に校正を行ってください。
- 取り付け前にゴムパッドを点検し、破損または劣化しているものは交換してください。
- 強風地域やトラッキングシステムでは、経年劣化による緩みを防ぐため、ロックナットまたはスプリングワッシャーを使用してください。
中間クランプと端クランプでよくある間違い
間違い1:取り付け時の位置ずれ
症状:
中間または端部のクランプがモジュールフレームの中心と位置がずれているため、取り付けが歪む。
結果:
力の不均一な分布、フレームの変形、クランプの緩み。
解決策:
クランプがモジュールフレームに対して垂直に、かつ全面が接触するように位置合わせしてください。
間違い2:不適切な材料選定
症状:
沿岸部のプロジェクトで標準的なステンレス鋼304製のファスナーを使用すると(孔食が発生しやすい)。
結果:
腐食、クランプの緩み、システム故障。
解決策:
沿岸環境では、耐腐食性に優れたステンレス鋼316製のファスナーを使用してください。
間違い3:締め付けすぎ
Symptoms:
Excessive torque application causes deformation of the module frame.
結果:
モジュール内部の微細亀裂、フレームの損傷、およびシール不良。
解決策:
トルクレンチを使用し、推奨トルク値(15~20 N・m)に従ってください。
間違い4:クランプの種類を不適切に組み合わせる
症状:
両端に中間クランプを使用するか、中央にエンドクランプを使用する。
結果:
エッジモジュールがしっかりと固定されない、または内部モジュールをインストールできない。
解決策:
モジュール間には中間クランプのみを使用し、端部にはエンドクランプのみを使用してください。
間違い5:補強されたエンドクランプの必要性を無視する
症状:
強風地域で標準的なエンドクランプを使用した場合。
影響:
強風により、アレイ端のモジュールが吹き飛ばされる可能性があります。
解決策:
強風地域では、補強されたエンドクランプを使用するか、エンドクランプの数を増やしてください。
システムに最適なクランプの選び方
中間クランプと端部クランプは、太陽光発電架台システムに不可欠な部品です。構造はシンプルですが、システムの安全性と長寿命を確保するためには、適切なクランプを選択することが非常に重要です。
Key Takeaways:
| 比較次元 | ミッドクランプ | エンドクランプ |
|---|---|---|
| 設置位置 | PVモジュール間 | 配列の端で |
| クランプ方法 | 両面 | 片面 |
| 主な機能 | 間隔を維持し、隣接する太陽光発電モジュールを固定する | エッジの固定、境界制約 |
| 負荷特性 | 対称荷重 | 非対称荷重 |
| 強度要件 | 標準 | (風荷重の増加により)高くなる |
| インストール手順 | 後からインストール | 最初にインストールされました |
選考原則:
- 位置によってタイプが決まります。中間クランプは内部モジュール用、端部クランプは端部用です。
- 環境によって使用する材料が決まる:沿岸部や高湿度環境では、ステンレス鋼316を使用する。
- 荷重によって強度が決まります。強風や積雪地帯向けには、強化されたクランプを使用します。
- モジュールによってサイズが決まります。モジュールの厚さとフレームの種類に基づいて、適切なクランプを選択してください。
SOEASY 完全クランプソリューション
太陽光発電用架台システムの専門プロバイダーとして、SOEASYはあらゆる用途に対応する幅広いクランプを提供しています。
- ミッドクランプシリーズ:標準タイプ、強化タイプ、調整可能タイプ、モジュール厚22~50mmに対応
- エンドクランプシリーズ:標準タイプ、強化タイプ、エッジストップタイプ、エッジ固定ニーズに対応
- 特殊クランプ:フレームなしモジュール用クランプ、二重ガラスモジュール用クランプ
- 材質保証:アルミニウム合金ボディ+ステンレス鋼304/316ファスナー+EPDMゴムパッド
- 認証と保証:厳格なテスト、10年間保証
お客様のプロジェクトが大規模な地上設置型システムであろうと、屋上分散型システムであろうと、SOEASYは最適な中間クランプおよび端部クランプソリューションを提供します。
よくある質問
ミッドクランプとエンドクランプの違いは何ですか?
中間クランプは隣接するモジュールを固定し、端部クランプは端のモジュールを固定して滑りを防止する。
補強されたエンドクランプはどのような場合に使用すべきですか?
強風地域や、大型の端部モジュールには、強化された端部クランプが必要です。
自分のプロジェクトに最適なクランプを選ぶにはどうすればよいですか?
クランプを選定する際は、モジュールのサイズ、環境条件、風荷重/積雪荷重、およびシステム設計を考慮してください。